 |
| A Key! |
The lost wax process involves carving something out of wax. Then, a little wax rod is attached to the object. And it's mounted on a base, and the base is fitted with a pipe-looking thing. Then, some plaster-like substance is poured into the pipe, which takes the shape around the wax object. It's then heated up in a kiln until the wax melts out and the plaster hardens. While the plaster is still warm, molten metal is poured in, and it ends up shaped just like the wax was. Cooling it in water breaks the mold and releases the metal object.
We're just doing the wax carving part, and then sending the pieces somewhere to be cast in metal.
I traced my design on tracing paper and then transferred it to my block of wax.
 |
| After Tracing the Design |
 |
| Cut Out Key |
 |
| Handle, Motor, and Foot Pedal |
 |
| So Far, So Good, I Think! |
 |
| Brunelleschi's Dome! |
 |
| They're hanging on my bulliten board now. |
In Food class, we studied the regions of Umbria and Lazio. Umbria is in central Italy (just South and West of Tuscany) and is completely surrounded by land. Lazio is South of Tuscany and along the coast.
Umbria is known as the Green Heart of Italy. It produces some of the best olive oils, and the best black truffles in Italy. They eat a lot of lamb and pork, especially porchetta (made from a baby pig). Lazio is the region of Rome, and the cooking of the region is entirely centered around Rome. They make simple pasta dishes like spaghetti alla carbonara. (I ate that in Rome!) They produce pecorino cheese and buffalo mozzarella. They eat tons of artichokes and prepare them in different ways.
The Umbria and Lazio dishes we made were:
Saltimbocca alla Romana (Veal cooked with Ham and Sage),
and Crostata di Frutta Fresca (Fresh Fruit Tart)
For the Veal:
Ingredients:
Salt and pepper
Flour
8 slices of veal, about 3-4oz each
8 slices of prosciutto (ham), the same size as the veal
8 fresh sage leaves
Couple of tablespoons of butter or olive oil
8fl oz white wine
First, place a slice of ham on top of each slice of veal, and then a sage leaf. Fasten together with a toothpick.
 |
| Veal, Ham, Sage, Toothpick |
Put some flour on a plate. Place each piece of meat in the flour only on one side (the side WITHOUT the ham and sage). Then lay them flour-side-up (on a separate dish), and sprinkle them with a little salt and freshly ground black pepper.
Melt some butter (or use olive oil) in a pan and place the meat in the pan for a couple of minutes to brown it. Don't overcook; it's very thin.
 |
| Cooking. . . |
After a couple of minutes of cooking, cover them with a splash of white wine.
When the wine evaporates, they're done.
 |
| Yum! |
Now, the Crostata!
Ingredients:
125g (4oz) butter
250g (8oz) flour
zest of 1 lemon
2 tablespoons powdered sugar
3 egg yolks
250g (8oz) sugar
5 egg yolks
75g (3oz) flour
500ml (18fl oz) milk
1/2 vanilla bean (or about a teaspoon vanilla extract)
strawberries, raspberries, blackberries, kiwi
(or whatever fruit you want to use)
Dump out the flour on the counter. Use your fingers to (quickly) work the butter in with the flour until it's crumbly. You can add the sugar and lemon zest now, too. Then make a hole in the middle. Put 3 egg yolks in the hole. Work the yolks into the flour mixture until the dough is evenly mixed and sticks together in a ball. Wrap the ball of dough in plastic wrap, and place it in the fridge for at least half an hour.
Make the custard. Beat the sugar into the 5 egg yolks until light and pale, then beat in the flour. Bring the milk to (almost) a boil with the vanilla bean (sliced deeply down the side) and then pour the milk into the egg mixure gradually, beating vigorously until well blended. Pour into a heavy-bottomed saucepan and bring to a boil, stirring constantly. Keep stirring until the mixture is thick.
 |
| Custard! |
Let the custard cool. Take the dough out of the fridge. Roll it out on a lightly floured piece of parchment paper, with a floured rolling pin. Then lift it up and lay it into a 13in tart tin. Ours was just a pie pan, and smaller than 13in. (I would guess it was 8in.) Then press the dough inside, make the edge of the crust pretty, and poke holes in the bottom with a fork. Bake it at 200 degrees C, or 400 degrees F, for 15 or 20 minutes, or until it's done.
 |
| Baked Crust |
If you want, you can take it out after 10 minutes and brush with egg white to seal the crust and keep it from getting soggy, and then put it back in to finish cooking. We didn't, because we were going to devour it as soon as it was done. (No time to get soggy)
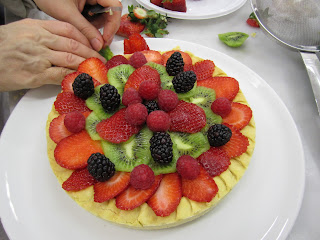
Take the crust out and put it on a serving plate. Let it cool. Fill it with the cooled custard. Decorate the top with fruit.
 |
| Fruit |
Or, you can just sprinkle the whole thing with powdered sugar.
 |
| Finished! |
Eat it right away, because it is delicious. It's like a vanilla pudding pie, with fruit.
Only classier: It's a Crostata.
Oh, and we got our midterms back this week! A's all the way. Even in Wine. I'm so glad I studied!
Yummy! We need to share recipes when you get home!
ReplyDelete